Dateline: 2.13.12
The Master of Cut-Away Technical Illustration Automotive Art
 Check out the slide show at the end of this post!
Please allow me to indulge myself and geeze a little. It seems that the farther north you are from the age of 50, the more times from the past begin to blur together. If you’re under 30 or 40 and are wondering what I’m talking about, just wait. I think it was somewhere around 1984 or 1985 the first time I saw one of David Kimble’s cut-away technical illustrations.
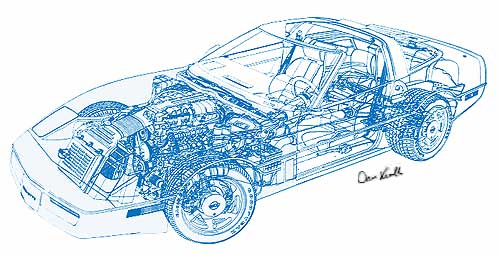
While Kimble had been working for many years as a technical illustrator for the US Navy, an RV company, the Chaparral Racing Team, the Harrison Racing team, and Sports Car Graphic Magazine, I believe that it was his 1984 technical illustration of the then-new 1984 C4 Corvette that put him on the automotive map. If it wasn’t his ‘84 Corvette cut-away that I first saw, then it was his Ferrari F40 cut-away that appeared in Motor Trend that definitely caught my attention. In the early ‘80s I was a freelance commercial artist specializing in machines. There was a wonderful magazine for commercial and graphic artists back then titled, “Step-By-Step Graphics” that was truly awesome for aspiring artists. Each issue featured several articles that took you on a step-by-step overview of exactly how the artist created their works. It was a terrific magazine.
One issue had a feature story covering David Kimble’s unique approach to the classic “cut-away” style of technical illustration. I was already familiar with James A Allington’s cut-away illustrations from a series of Shell Oil print ads that ran in the late 60s featuring famous road racing cars, such as the Ford GT40, Jim Hall’s Chaparral, and others. But Kimble’s style was quite different and unique. Where as most cut-away technical illustrations show what’s under the car’s body by illustrating a section of the body that seemed to be snipped away, Kimble created a new dimension to the “cut-away” body sections. David’s illustrations looked as if most of the car’s painted body was transparent. Parts, such as tires, wheels, floorboards, dash panels, transmission cases, valve covers were either transparent or used the traditional “cut-away” technique. When you look at a Kimble technical illustration, you experience a journey of discovery. For us gearheads, Kimble’s art satisfies the the question, “What’s under there?”
The Step-By-Step graphics feature story on Kimble and his work explained the the process, and it isn’t easy. An actual car is needed for photography. Once the angle of view is determined, photographs of the car’s exterior are taken. Then the fun begins. As much of the body that can be removed is taken away and at each step, photos are taken with a tripod-mounted camera. After as much of the car is taken apart as possible detail photos and close up shots are taken for reference.
On the drawing board, the process begins with a careful pencil tracing of the basic shapes. Here’s where the artistic part comes into play. Parts that are not obvious in the photos are guestimated into the drawing. This is where technical illustration and engineering merge, as the technical illustrator must have an understanding of what hidden parts look like, how they function, and how they fit into the car’s structure. Obviously, not “everything” is drawn, so it’s an artistic judgment call as to what to illustrate and what to keep hidden for the sake of the final image’s overall clarity.
After the pencil drawing is completed, Kimble uses Rapid-O-Graph Technical Pens, ellipse templates, french curves, and straight edges to create his pen & ink illustration. For many technical illustration projects, the completion of the pen & ink illustration is the end of the process. But for David Kimble, he’s about half way complete. So, here’s where the magic come in. The completed pen & ink technical illustration is then sent out to have “film positives” made. Hardly anyone does this kind of reproduction work anymore because it requires the use of a “stat camera.” Stat cameras were typically big setups situated in a special camera room with a photo sensitive red light, just like a black & white photo processing dark room. The stat camera has a high-quality glass camera lens and used panchromatic high-contrast film that could produce perfect reproductions (no dots-per-inch resolution) of pen & ink art or photocopy text. The reproductions can be made on either photo “paper” or on photo clear film. The photo clear film was called a “film positive” or a “film pos.”
Kimble would use two film positives of his art. One film pos was held aside for the final step. On the other film pos, Kimble would use a masking film called “frisket” and careful mask off the various parts and airbrush the colors of the parts on to the back surface of the film pos. Then on the front side of the film pos, Kimble would frisket mask off the areas that he did not want sprayed the body color, then airbrush the car’s skin. But when the frisket material is applied to the film pos for masking, the areas to be airbrushed are cut away using an X-Acto knife. The process works, but in doing so, the X-Actor knife leaves fine cut lines on the film pos. “Just the right amount” of knife pressure is needed so that David doesn’t completely cut through the frisket and the film positive.

After all of the parts and body surfaces have been airbrushed, the second film positive is carefully laid over top of the painted layer so that both pen and ink illustrations are in perfect alignment. Placing the second film positive over top of the painted film positive in perfect alignment covers all of the tiny cut lines from cutting the frisket away.
So, the process is: 1. Photograph the car and photo reference of the various parts. 2. Work out the pencil technical illustration. 3. Complete the pen & ink technical illustration. 4. Have film positives made. 5. Airbrush the parts on the back surface. 6. Airbrush the skin on the front surface. 7. Align the second technical illustration film pos over top of the painted film positive. And that’s all there is to it!
That last sentence was in jest, of course. How many hours does it take Kimble to complete one of his technical illustrations? I’m not exactly sure of what that number is, other than A LOT. And one can safely say that 99.999% of people wouldn’t have the tenacity and patience to do this. And that’s what makes David Kimble a “Master.”
After Kimble’s ‘84 Corvette and Ferrari F40 projects, it didn’t take long for the automobile manufacturers to tune into his skills. David has created his unique technical illustrations for all of the major car companies and a few non-automotive businesses. HIs most famous non-auto project is arguably his cut-away illustration of the starship USS Enterprise from the Star Trek series. His rendition of science fiction’s favorite space ship is truly mind boggling.
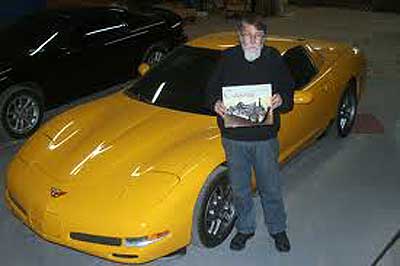
 Fortunately for Corvette fans, Kimble has created numerous Corvette technical illustrations, as well as illustrations of nearly all of the most important Corvette and Chevrolet engines, which will be the topic of another post here at CorvetteReport.com. The below slide show are all of the Kimble cut-away Corvette technical illustrations I could find on the net. Unfortunately, I do not have Kimble’s finished ‘84 Corvette, just a bare technical illustration line drawing. But I was able to find 19 Corvette and Camaro images to share with you (plus an image of the master illustrator himself) that includes: the line drawing of the 1984 Corvette, the 1990 ZR-1, a line drawing of the C4 ZR-1 Corvette, the C5 1998 Corvette convertible, the C5 Z06 Corvette, the C5 Z06 Corvette and the C5-R Corvette race car, the C6 Corvette chassis, the C6 Corvette chassis and frame structure, a complete 2005 C6 Corvette, a 2005 C5 Corvette convertible, a 2006 C6 Z06 Corvette, a 2009 C6 ZR1 Corvette, a C6.R Corvette race car, Jim Hall’s Chaparral 2E race car, and a 2010 SS Camaro.
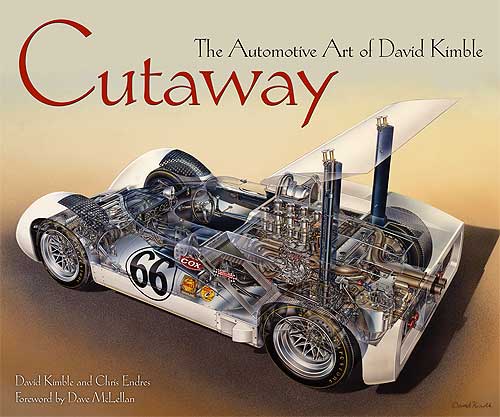
And to close out this short overview of David Kimble’s amazing work, we’re pleased to inform you that David Kimble has a book of his work coming out this year titled, “Cutaway – The Automotive Art of David Kimble” by David Kimble and Chris Endres, with foreword by former Corvette Chief of Engineering, Dave McLellan, and published by Motorbooks International. When the book is available, we’ll let you know here. Enjoy the below slide show and the related links. – Scott
Related:
http://bigbendnow.com/2011/12/kimble%E2%80%99s-new-book-celebrates-airbrushing-and-the-automobile/
http://www.khulsey.com/masters-david-kimble.html
[nggallery id=66]
David Kimble in Marfa, TX Video. The video is about the little town of Marfa, Texas and the interesting people that live there. David Kimble shows up about half way through the video.
No Place Like Here: Marfa, Texas from Etsy on Vimeo.
