Dateline: 9.23.11
An Inside Look at What It Takes to Design a Modern Electronic Toy
 Introduction: Before we pick up our RideMakerz C6.R Corvette story, allow me to briefly explain my background and involvement in this project. I worked in the R&D Department of Tyco Toys from 1992 to 1997 when we were bought out by Mattel Toys. From 1997 to 2001 (when I was employed there) our design group was known as Mattel Mt. Laurel. (we were located in mt. Laurel, NJ) During my nine years as a direct employee, plus my previous four years as a freelance designer, I worked in the packaging department, the Boys Toys R&D Group, the Prelininary Concepts & Design Group, and the Matchbox Collectibles Direct group. I worked on Tyco H/O Electric Racing, Tyco Radio Control, Matchbox 1-75 die cast, Matchbox Play Sets, and Matchbox Collectibles. My tasks included decoration and graphics design, toy concepts, project management, and product manager. At one time or another I did everything from initial product concepts to preproduction approvals. Being a lifetime “car guy” I was in “Hog Heaven” working there. It was a college-level experiential education and I got to work with some of the most creative people I have ever known.
 The RideMakerz project came along in 2006 through my friends at Scrambled Eggz productions in Medford, New Jersey. I have known Tom Waters and Jim Mendillo for over 25 years and they were well aware of my extensive car and racing background. So when their art director, the amazingly talented, Don Amadio, called my about the RideMakerz project, I was right one it. It was a pleasure doing the semi-cartoon-like styling of about 2/3s of the Ridemakerz body designs, along with a lot of the accessory parts. Unfortunately for me, when wave 2 of the RideMakerz car bodies came along, Scrambled Eggz designer/art director, Don Amadio, had the time to do the C6.R Corvette body himself. And I must say, he did a magnificent job. Shaping the stylized bodies to existing common chassis, with just enough characture styling isn’t as easy as it looks.
 As a designer, my “coolness” gauge is based on my fist, initial “look” at a design. After you work on a drawing for a long period of time, it starts to get “stale” in your mind’s eye. But several months later, when Don sent me the photos of the initial sculpts, my initial impression was a definite, “WOW!” I hope that you enjoy this behind the scene look into the world of toy car design. – Scott
How does something like this come together? The answer is, “Not easily.” After Andreini and Clark joined forces, a dream-team had to be built. RIDEMAKERZ worked closely with GM, Ford, and Chrysler on all of the body designs and licensing. The team from Kick Design was brought in as creative directors and created the RIDEMAKERZ logos, the brick & mortar store design, and website. They are also the force behind Corvette Racing’s “Jake” and BadBoyVettes.com. Andreini brought in Scrambled Eggz Productions to create concept sketches for all of the body and accessory designs, control drawings used to make tooling patterns, as well as graphics for the decals and packaging. I was privileged to be a part of this team effort through Scrambled Eggz, and worked on several of the control drawings and designs for the accessory parts. A custom car toy line needs a high-profile spokesman, so Andreini also brought on board Chip Foose, renowned car designer and host of The Learning Channel TV program, “Overhaulin,” as a technical advisor.
 With the spread of cars ranging from the big Dodge Ram and the little Mini Cooper, two chassis lengths were needed. The chassis pan has connection points on the sides for side pipes, running boards, and ground effects lighting accessories. The attachment points for the front and rear are integrated into the bodies. The base model chassis is a flat pan with undercarriage details. The chassis for the R/C version looks the same as the base version, but with the R/C hardware on the top side. The static versions have the built-in sound chip device, and head and tail lights that are activated with a button located in the hood of every body. Clearance for the electronics and battery for the trucks was no problem, however for cars such as the Corvette, care had to be taken to make sure that the body cleared the R/C hardware.
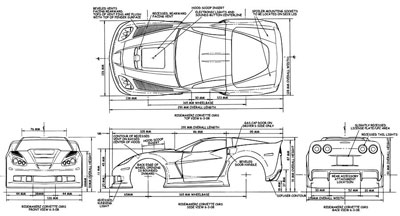
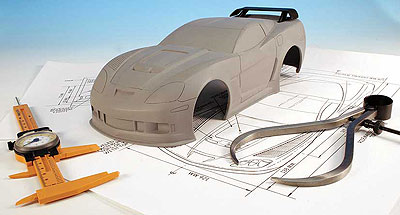
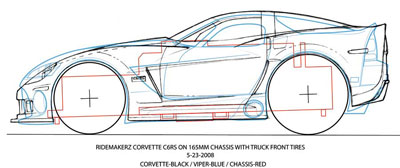 With the mechanical parameters determined, the real fun for the designers had just begun. The RIDEMAKERZ team determined that they did not want the body styling to be too car-toon-like. All of the cars have larger rear tires, except for the off-road chassis that uses large monster truck-type tires. The bodies have a slight forward rake and are wider in the back than the front. Front 3/4 pencil drawings were created to establish the attitude of the body. After preliminary approvals, the next step was to create side, top, front, and rear mechanical drawings to define the body shape. The completed 5-view drawings were then sent to the pattern makers for sculpting. The day of the arrival of the jpeg images of the first pattern sculpts is always exciting for the team. Up to that point, everything has been sketches and mechanical drawings. Here’s where the project starts to look like a real toy. The jpegs were carefully reviewed by the team and changes initiated.
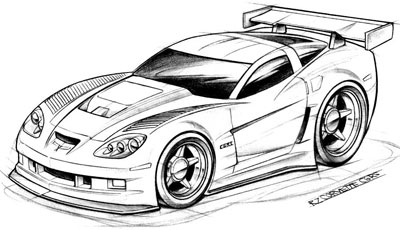 After changes are completed and approved by the team, revised images are sent to the licensor for approval. This stage can be a little bumpy. Once licensors were on board with the RIDEMAKERZ concept and understood that the shapes were stylized designs, things progressed smoothly.
While all this was going on, there were hundreds of sketches being created for all the other parts. Wheel and tire tread designs were created and worked out. Accessory parts were conceptualized and drawn in 3/4 view. Decals and box graphics were being created and worked out. All of the cars have blinking headlight and tail lights that are coordinated with the sound chips that had to be created. First there’s the car alarm chirp, then the engine idles, revs up, car horns blair, wonderful sound of tires doing a burnout, the car blasting off, screeching braking tires, and the final car alarm chirp.
 Upon licensor approval, the green light is given to start cutting steel tooling. Here’s where serious money is committed, as steel tooling for a toy of this size can cost as much as $100,000 for one body. The accessory parts were another matter, with parts grouped into common molds with common decoration, such as vac-metalized plating. Special spray masks for painting had to be created for some of the wheels and bodies.
Sculpt-1.jpg
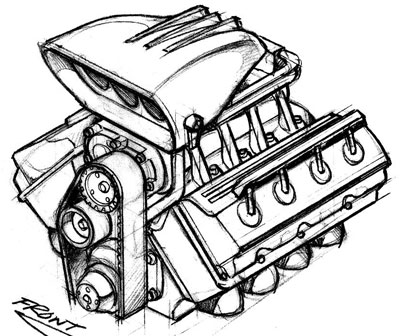
Every detail has to be worked out. Look behind the wheels of a RIDEMAKERZ toy and you’ll see brake rotors with holes and slots details. The underside of the chassis has relief details depicting a parameter frame and suspension details. The engines have fuel lines, belts, and working butterflies. The R/C controller design had to be worked out as well. When I was a designer at Tyco Toys and Mattel Mt. Laurel, the designers would sometimes joke that we spent more time looking at the toy than the child ever will! With what feels like a zillion details to work out, a toy line such as this is an enormous undertaking for the entire team.
 While the cars, parts, and graphics designs were being worked out, the Kick Design team created the packaging and a complete kid-friendly, car customizing store environment. First, the storefront design had to look cool and be inviting. Inside, product racks, displays, decoration, work and play areas had to all be created and worked out. Each store has an assembly area with battery-powered screw drivers that hang down like impact wrenches in a real garage and trained RIDEMAKERZ mechanics to assist. A basic car costs between $10 for the RZ Wedge Tuner car, to $29 for a red or black C6.R Corvette, or $40 for the C6.R Laguna. Ala’ carte accessory parts cost between $2.00 and $15. Wheel sets are just $5.00 and an R/C chassis for your RZ car is $25.00. A tricked-out C6.R Corvette comes in a little under $100, the Jake version a little over $100. Too bad the full-sized hardware isn’t this inexpensive.
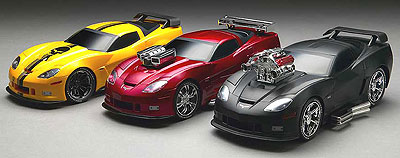
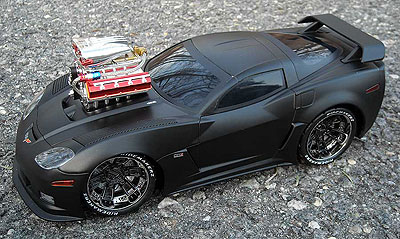 From the beginning of the RIDEMAKERZ enterprise, the C6 Corvette was on the “A” list. But early on, GM was flooded with licensing requests for the new Vette. The car was so new that GM wasn’t warm to a characterized version of the new Vette. But as the new Pratt & Miller C6.R racing Corvette continued on its winning ways, and fans embraced the edgy new “Jake” paint design, GM warmed up to the idea. The C6.R Corvette is one of the least characterized of all the RIDEMAKERZ cars. The C6.R itself is already a caricature of the Z06 Corvette. The extra front air dam, racing hood, vented front fenders, side skirts and rear wing are natural elements for a RIDEMAKERZ-styled car.
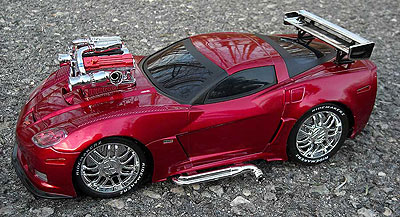 The C6.R is available with or without the R/C option, and is available with the 4×4 off road chassis. (Imagine that, a 4×4 off road C6.R!) All of the RZ accessory items, except for the truck-only gear, will fit on the C6.R. The body is available in 3 color combinations: candy apple red, mat-black, and the Jake – a delightful toy version of Pratt & Miller’s astonishingly successful C6.R. Currently there are several highly detailed die-cast street and Jake versions of Pratt & Miller’s C6.R. In almost every instance, they sell out almost as fast as a C6.R on the Mulsanne Straight.
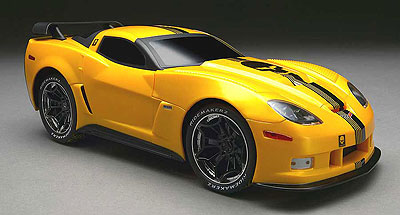 The RIDEMAKERZ team better have lots of extra Jake bodies on hand because when the Corvette world gets a whiff of these, you’re going to see tire tracks right out the door of your local RIDEMAKERZ shop. RIDEZ can be purchased online at RIDEMAKERZ. com or atone of 12 stores from Glendale, Arizona to Baltimore, Maryland, and Appleton, Wisconsin to Friendswood, Texas. And at less than a fraction of 1-percent of the cost of a real C6.R, who can argue with the price? So dads, let your youngster build a totally cool ride of their own. And while you’re at it, build yourself a C6.R! – Scott
PS – Enjoy the below slide show.
[nggallery id=34]
PSS – I think you’ll enjoy these sites…
http://www.scrambledeggz.com/
http://ridemakerz.com/
Here’s the BEST way to keep up with K. Scott Teeters’ Corvette blog!

